6. Object Panel
6.1. Groups
Objects can be combined into groups; groups can also exist as subgroups within other groups (see Fig. 2), enabling the user to build up a hierarchy of objects to describe an anatomy. For instance, an arthropod model might include a group called ‘appendages’ – this in turn might include a subgroup called ‘cephalic’ appendages, which might in turn include a ‘mandibles’ group, consisting of a left and right mandible. Object grouping not only provides a convenient way to explain relationships, but also allows visiblity to be controlled for sets of objects – in the above example for instance a key could be assigned to the appendages group, allowing the entire appendage set to be quickly hidden or shown.
Groups are indicated in the panel in a standard way (Fig. 2); they can be expanded or collapsed to show their contents. Groups only have two properties; their shortcut key, and their visibility.
Groups are created by selecting a number of objects and using the Group command (Ctrl-G) on the Objects menu. You should normally rename groups after creating them. Groups are removed by selecting the group and using the Ungroup command (Ctrl-G) on the Objects menu. Selecting objects and using the Ungroup command will remove them from the group they are currently in. You can also move an object into an existing group with the Move To Group command (Ctrl-G) on the Objects menu.
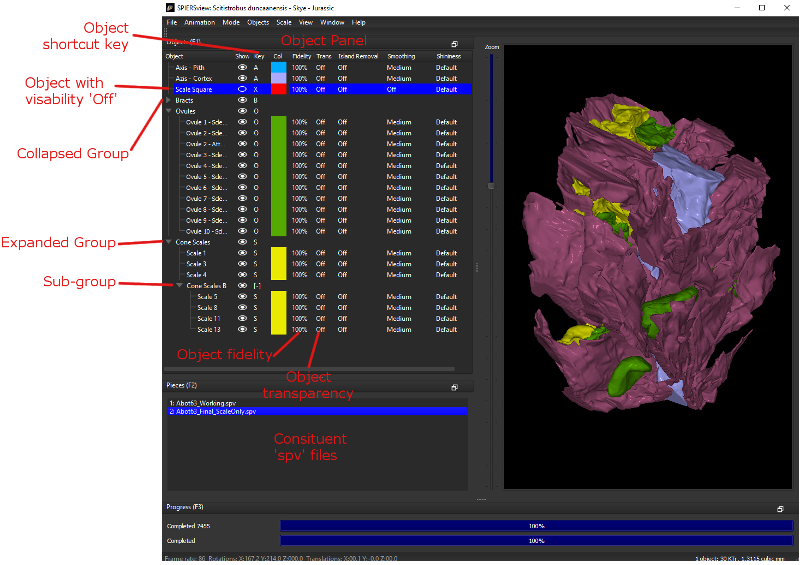
Figure 2. Default anatomy of a SPIERSview object pannel
Turning visibility off for a group does not alter the individual visibiity settings of contained objects (or groups), but overrides them so they are all hidden. In Figure 2 for instance, all objects in the ‘Trunk Apps’ group are currently invisible (whatever their individual visibility setting), as this group is set to invisible. Once visibililty is turned on again for the parent group, the individual visibility settings of its contained objects (or groups) are used again.
6.2. Position in object panel
Objects (and groups) can be moved up and down the list in the objects panel using the Move Up and Move Down commands (F12 and F11 respectively) on the Objects menu. These changes affect only the panel, and have no effect on the way the model is displayed.
6.3. Object properties
Objects listed in the object panel have seven properties detailed in columns to the right of the name (see Fig. 2; not all columns are visible at default panel size). The name (1st column), visibility (2nd column), shortcut key (3rd column) and display colour (4th column) are all modified simply by double-clicking. Note that display colour has no effect for VAXML/PLY datasets where the imported object has surface colour. The properties in the right hand five columns (Fidelity, Transparency, Island Reduction, Smoothing and Shininess) are set using commands on the object menu. Of these, only transparency and shininess are available in Finalised/VAXML mode.